Progressive Web Apps(PWA) are the web apps which are dynamic and can be run offline which means at standalone. The benefits of Progressive web apps in its usage and other factors are as follows:
- performance of the app;
- The ability to work online means with internet connectivity or offline means without internet connectivity.
- specific to platform
- capable to install or installable.
Create a React App with the Progressive Web App Template
Before starting the coding part of the Progressive Web Apps, you have to begin to set up the project. Let’s begin by making sure that you are able to use React (if you’re already familiar with coding in React, you can probably skip this section!).
A popular utility or feature for using packages and libraries is the Node Package Manager, simply referred to as “npm”. This feature allows you to install/uninstall packages, start your React application build using webpack, and many more other features. For your needs, you can take advantage of npm to create a React application with comprising PWA template, which lets you to code right away. Whenever we start building a React app, we can use templates offered by Facebook using the ‘create-react-app’ command with npm.
Let’s create and build the PWA starter app by running the following command:
npx create-react-app name-of-PWA-App --template cra-template-pwaThe above commands can be broken down as follows:
- npx: Every npm command needs to start with npm (or essentially with whatever node package manager you have installed, but ‘npx’ is used here, which comes with npm version 5.2.0). This enables you run npm packages.
- create-react-app: This command lets to create the react app.
- name-of-our-PWA-app: This is the name of the PWA react app which we are using .
- –template: This is an argument used for template making. When you have the argument, you’re essentially enabling an option in the same command. Here, you can define a specific template for our starter react application.
- cra-template-pwa: This is the name of the PWA template for your PWA react application.
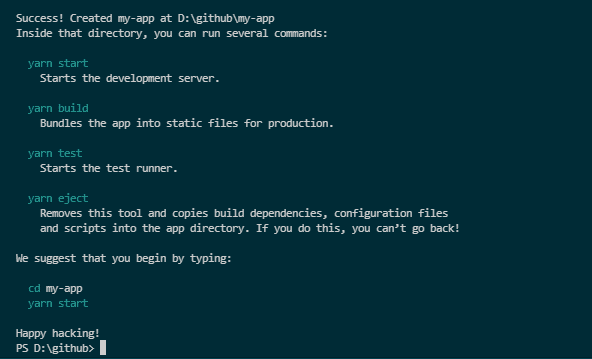
Press the ‘Enter’ button after the above command must start the building of your PWA React app. You should see a sequences of command like prompts in your cmd or command-line-interface. It take s few minutes, but if you can see this screen after the command, you have created the project.
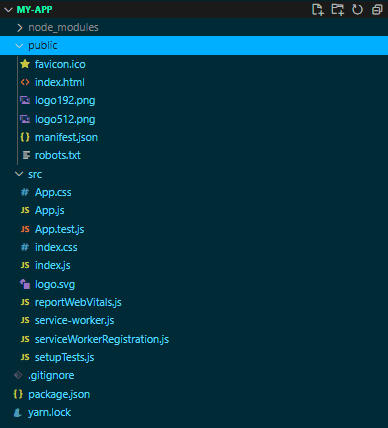
Here , we can see the following folder structure of the application so far. There are a few files that you should watch for when it comes to PWA’s:
service-worker.js: This is the script which runs at the background of your application once the app starts and it ensures that the service-worker enables us to work the app offline and handles multiple requests from the UI.
manifest.json: It is basically the configuration file which specifies the list of different properties which can be customize specifically for the PWA(Progressive Web Applications).It can be used to determine the icons, colors and names to be used, when the app is displayed.
serviceWorkerRegistration.js: The job of the file is to tell whether the service worker was successfully registered or not. If we watch into the file, we will see and notice the multiple console logs which will be displayed which depends on the status of the service worker once you deploy your application.
Adding a Simple React Component
For this project, we will build a simple Counter component, similar to the example which is provided in the React docs: https://reactjs.org/docs/hooks-state.html
Let us start by creating a Counter component. Here, it is named Counter.jsx and placed in a components folder.
To speed things up, you can copy and paste the following code into your specific files. Here, it is built out as a simple page and some generic stylings for the component.
//Counter.jsx
import React, { useState } from 'react';
import Button from '@mui/material/Button';

function Counter(props) {
    let [counter, setCounter] = useState(0)

    function Increment() {
        setCounter(counter + 1);
    }

    function Decrement() {
        setCounter(counter - 1);
    }

    return(
        <div style={{textAlign: 'center'}}>
            <h3>Counter App</h3>
            <div>
                <Button variant="contained" onClick={Increment}>+</Button>
                <span> {count} </span>
                <Button variant="contained" onClick={Decrement}>-</Button>
            </div>
        </div>
    );
};

export default Counter;
Note: Here, Material UI’s Button component is used. You don’t need to do anything extra difficult and can substitute the Button component with:
<button onClick={Increment}>+</button>For using Material UI, run the following npm commands:
npm install @mui/material
npm install @emotion/react @emotion/styled //these are additional dependencies for me to get Material UI working with the Counter component
Running Your Application
In command prompt or cmd, entering the command ‘npm start’ can point up your application to a specific localhost URL. You can bgin to see what work we have done so far.
With the simple components designed, let’s try to run this application up and make sure that it is working.
Enter the following command:
npm startThis command starts the application to a set localhost URL. Once the development server is working and live on the command prompt, go to the URL for view the application. You should see something similar to below image:

Now, it is all good and ready to have app live and working, but more interested for the PWA aspect.
Running Progressive Web Application
Focus on the index.js file. Make following change:
// If you want your app to work offline and load faster, you can change
// unregister() to register() below. Note this comes with some pitfalls.
// Learn more about service workers: https://cra.link/PWA
serviceWorkerRegistration.register(); //change the service worker registration from 'unregistered' to 'registered'
Essentially, changing the service worker from unregistered to registered will allow to utilize app even when it is offline which is a key benefit when it comes to PWAs. Check Google’s explanation on this topic for more information: https://developers.google.com/web/fundamentals/primers/service-workers/registration
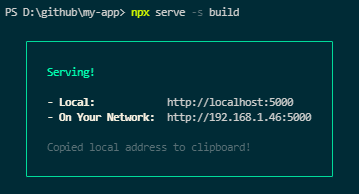
With the PWA files setup, in order to view the difference, we can deploy your application to static server using serve package which will serve our application to the localhost. In a nutshell, make sure that you have the serve package by installing and building the application again, and using serve to deploy the application:
npm install serve
npm run build
serve -s build //if you encounter an error with this command, try 'npx serve -s build'
Once you use serve command, you should see following message, that is your application deployed to http://localhost:5000. It automatically adds URL to clipboard as well for the quick pasting in our browser.
If you enter localhost URL in our browser, we should see something similar to this:
PWA Features
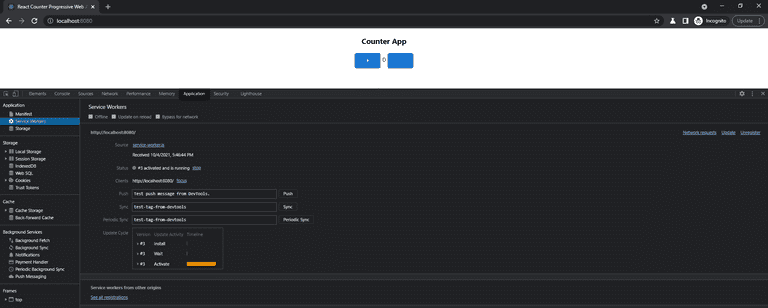
With the PWA React application live, let’s take a look under the hood and open up the Developer Tools (for Google Chrome, entering F12 opens the Dev Tools).
After registering service worker from index.js, we should be able to see it running in the Application tab. Inside that tab, on the left side, we should see a Service Workers section. From here, we can see http://localhost:5000. We have a Service Worker from service-worker.js file and is activated/running.
In the section above, we can see Manifest — opening that should show you the relevant details we listed from your manifest.json files.

With PWA app running using React, we successfully built our first PWA React application! From here, we can test many PWA features, such as installation, offline viewing, and Lighthouse audit testing.
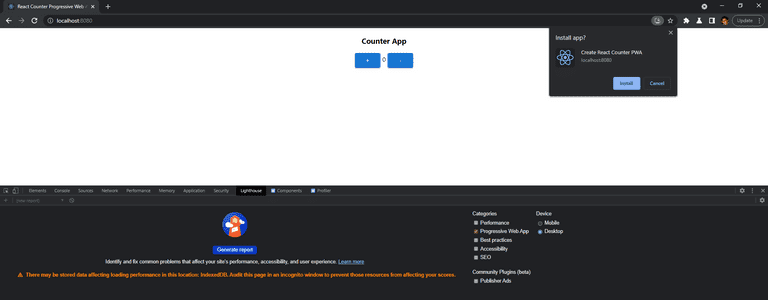
If you hit the ‘+’ symbol on the right side of the URL ba,r you can install your PWA, just as done here.
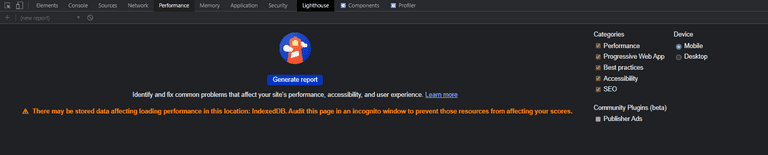
Use Workbox Lighthouse for testing the capabilities of your PWA: https://developers.google.com/web/tools/lighthouse
Conclusion
In this blog, we have learned regarding the creation of the Progressive Web Apps using React.js and also implemented it successfully.