Junk records or wrong emails can come into your pardot account in multiple ways. There are common ways, including via form submission (someone enters a flawed email address to avoid being added to a pardot mailing list), import, or even sync to Salesforce.
Instead of spending hours manually cleaning records, use an automation rule to clean your database automatically.
In this pardot method, we’re going to make an automation rule that looks for the email domain (the part that comes after the @ Nan@12), and if the email domain is a flawed one we are going to mark that prospect as Do Not Email in Pardot.
The ‘Do Not Email’ field is the field pardot uses to mark someone as Hard Bounced, so the side benefit here is that we’re going to reduce the number of mailable prospects in our Pardot database, which reduces the overall costs of Pardot.
Step 1 – Create one automation rule
Give the name is – Junk cleaner automation
The rule is based on:
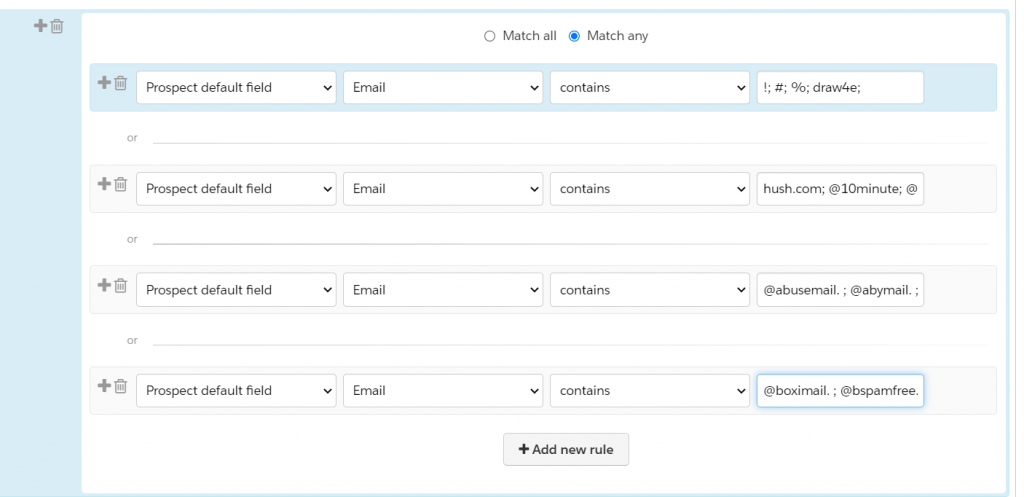
Prospect default field is Email Contains
You can see in the image attached

And then the actions will be to mark the prospects as Do Not Email.
Change prospect default field [ Do Not Email ] to [True ]

Step 2 – Make a Bunch of these lines
The text box on each row can only contain 250 characters
Click on add new rule group button in that you can add multiple rules to Group
Then, you’ll see two options on the screen, one is Match all and the second is Match any
Be sure to set the match type to “Match any” so that you get an or between each row.

Step 4 – Find the bad emails, not supported domains, and put them into a containing block.

The data shown in the image are insufficient data and the wrong domain and you can add more junk domains as you find them.
We have to add this data to contain text. The word is separated into pardot by a semicolon.
Add this data to our automation rule
Step 5 – Choose to Execute in real-time
At the bottom of the automation, the rule is this option to execute in real-time.

This setting makes it so that when a form is submitted an automation rule will be triggered, making a real-time check against the person submitting the form.
If the person matches this rule, then this automation rule will run before some of the form completion actions run it is meant to allow you to make complicated assignment rules based on the fields of a form, like if the person is from India, then assign them to the Indian sales team, or if the person is from Japan, assign them to the Japan sales team.
But in this case, this setting will mark the prospect as unavailable … before any email is sent to them.
So, if you are getting your content and delivering the content by email (not with an automatic download) this will allow you to block sending the form’s autoresponder email.
Step 6 – Preview automation
Preview your automation before starting.
This rule could make your entire database unmailable if you set up the rules wrong.
Use automation rule preview, to review if any incorrect automation rules are made
Step 6 – Run your automation
Now you’re ready to get a clean database
Note– It is advisable to preview automation once when you edit