If you want to learn how to set up complicated administrative processes that combine multiple tasks. The best tool for this is the B2C Commerce jobs capability, where you can schedule tasks that: Automate import and export, Replicate data or code, Build a search index, Perform custom tasks
In SFCC a job is a set of steps that perform long-running operations such as clearing cache, downloading an import file, or rebuilding a search index. When you create jobs, you can use out-of-the-box system job steps that don’t require any coding. If there isn’t a system step available to do what you want, then you can write a custom job step.
These are some typical reasons to use jobs.
| Data | Application |
| Customer | Export customer records to an external system to a Cloud such as the Marketing cloud. |
| Promotion | SFCC exports promotion data to an external customer service software system so that a shopper calling a customer service representative (CSR) gets the same promotions as they would online. |
| Catalog | In SFCC If you want to perform special catalog exports for tax systems so that the tax software knows what the product type is to calculate the correct tax. For example, in the United States, Massachusetts doesn’t tax apparel under a certain price but does tax electronics. |
| Catalog | In SFCC you want to perform special catalog exports for Google Merchant, so Google search results display the current storefront price for products. |
| Order | Perform custom order exports. Some order management systems don’t understand the SFCC order.xml requirements. Feed files must be custom-made and must be transferred. |
Let’s start
You noticed that some job functionality in SFCC Business Manager is labeled as deprecated.
Jobs (Deprecated), Job History (Deprecated)
The above options are for an older SFCC job framework that you can still use to manage legacy jobs. However, there’s a new-and-improved job framework, and you want to use it for new jobs. Following are some advantages of the new job framework.
If you want can use out-of-the-box system steps that require no coding.
SFCC Developers can create custom job steps using their preferred IDE to write a CommonJS module.
You can use flows. Flows are used to set up parallel execution of job steps.
You can start jobs using OCAPI as well as monitor jobs using Open Commerce API (OCAPI).
You can monitor the progress of jobs in SFCC Business Manager.
Let’s get learn how to use this new job framework.
Important Job Concepts
Before you can plan and create jobs, you need to understand these key concepts.
- Job flows
- Job scope
- Job locks
- Job schedules
- Job Flows
A job flow controls the sequence in which SFCC executes job steps. If you want to create a job, then every job must contain at least one flow. That flow must contain at least one job step.
We want to create a flow then you can configure sequential flows, which execute one after the other. In the SFCC Business Manager user interface, sequential flows take up the width of the page (1) and execute in the order shown, from top to bottom.
To access SFCC Business Manager, you must have an SFCC (B2C Commerce) implementation. Here, assume that you are an SFCC administrator with the proper permissions to perform these tasks like sandbox instances. If you’re not an SFCC administrator, that’s OK. To learn how administrators would take these steps in a sandbox instance. If you have a sandbox instance of B2C Commerce, you can try out these steps in your instance. If you don’t have a sandbox instance, ask your reporting manager if there is one that you can use.
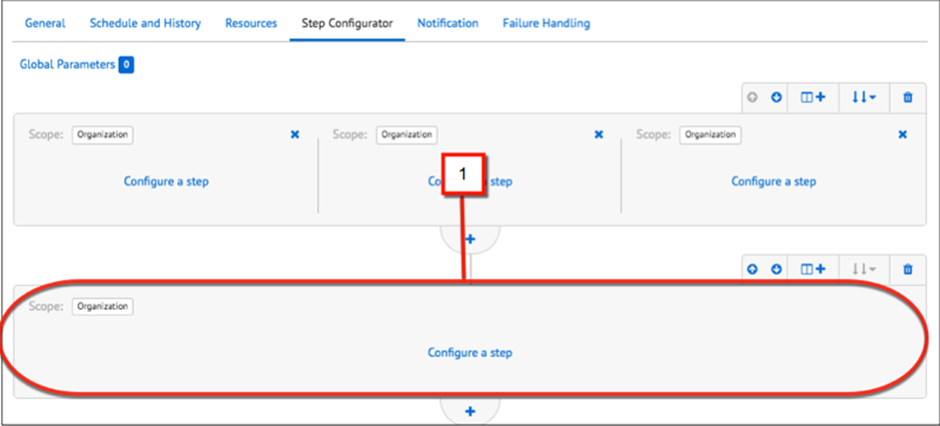
You can configure sibling flows also, which execute in parallel. The SFCC business manager displays sibling flows next to each other (1).
Sibling flows run simultaneously as long as system resources are available. If parallel execution isn’t feasible—for example, when multiple parallel steps need to access external resources at the same time—you can configure sibling flows to execute sequentially. Inflows, sequential sibling flows execute from left to right.
If there aren’t enough resources available, SFCC executes sibling flows sequentially, even if you configure them to run in parallel. Also, certain job steps don’t support parallel execution, so they’re always executed sequentially even if you configured the flow that contains them as a parallel sibling flow. For example, SFCC always sequentially executes the ExecutePipeline system step that supports the execution of legacy pipelines to avoid database conflicts.
When you configure a sequential flow to run for more than one site SFCC executes the flow in parallel for the different sites, as long as there are enough system resources to accommodate parallel execution.
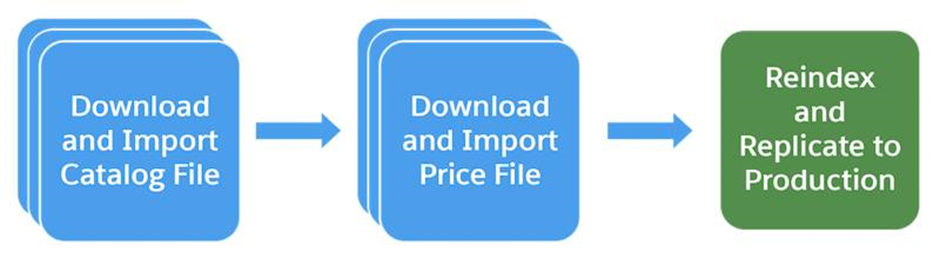
Using sibling and sequential flows, you can configure jobs that have multiple flows that rejoin into a single flow. Let’s take an example: Sibling parallel flows download catalog files, further followed by a sequential flow that imports catalog files, and further followed by another set of sibling parallel flow that download price files, and further followed by another sequential flow that imports the price files. Your created job can finish with a sequential flow that reindexes and replicates to production.
The following image shows what happens when you configure three flows.
Job Flow Scope
You must assign every flow to a scope. The scope can be either the entire organization or one or more sites. By default, flows execute for the organization. In SFCC Some job steps are only valid with a certain scope. For example, index rebuilding requires a site-level scope and can’t run under an organization’s scope.
Job Locks
When you set up a job, you can assign certain resources to it. While the job is executing, SFCC locks that resource and you and other users can’t modify it while the job is acting on it. This preserves data integrity and prevents data conflicts.
Job Schedules
You can run jobs manually or schedule them to run automatically at certain times and intervals. We want to execute a new job, then a job doesn’t start if a previous execution of the same job is still running, so it’s important for you to understand how long a job takes to execute before scheduling it. It’s also important that you schedule jobs so that multiple jobs don’t try to acquire a lock on the same object at the same time.
In SFCC you can run as many as 15 jobs simultaneously.
Modes
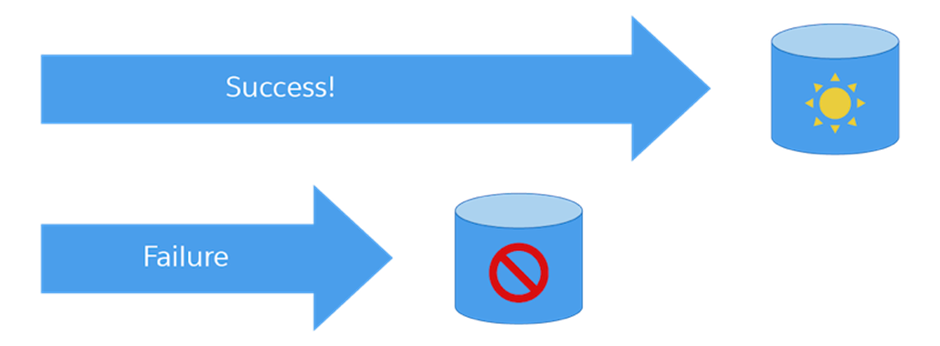
What is job success with SFCC?
Simply, it means that SFCC executed the job without error and the data ended up exactly where it was supposed to and how it was supposed to as in, completely reindexed and ready for storefront search. If a job fails, it’s possible that SFCC completed only a portion of the new data transfer, and the result is a mix of old and new data. That’s “bad data.”
Jobs fail for other reasons. You typically can use jobs for mass data or long-running operations, which can fail due to network or power fluctuations.
Create the Job
Here’s how to create a job to import a catalog.
Open SFCC Business Manager.
Goto Administration > Operations > Jobs.
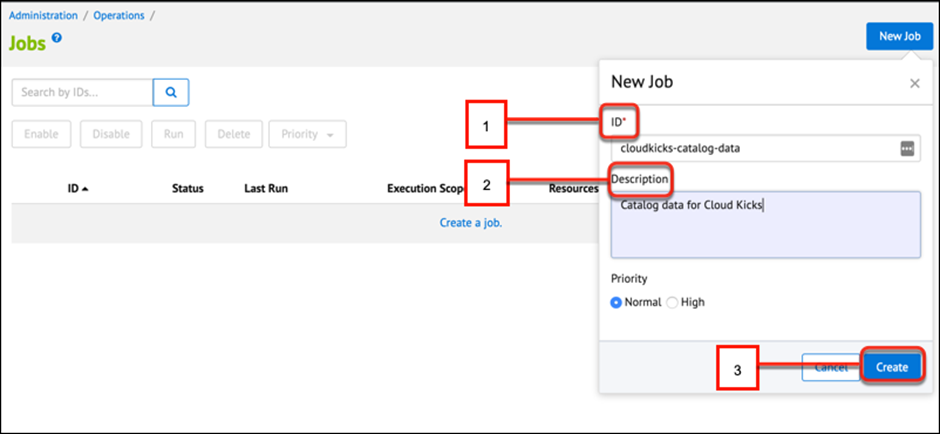
Click New Job (1).

In the ID field enter cloud kicks-catalog-data as the ID (1) and Catalog data for Cloud Kicks as the Description (2).
Ignore the Priority feature field. It’s not supported at this time.
Click Create.
Click the Schedule and History tab.
Click and select Enabled to run the job on a schedule. If the job isn’t enabled, then you can still trigger it manually.
Select one of the Once to trigger the job to run once, or select Recurring Interval.
For jobs, you want to run on a recurring interval, use the calendar icon to select a date in the past. If you don’t schedule a date in the past, then you have to wait for the date you specified for the job to run. You also select a day of the week, a time, an interval, and the number of times the job should run.
Lock Resources
You can lock a resource to prevent another user or job from changing it while your job operates on it. For example, while you update your catalog, you don’t want other jobs or users to update or change the catalog, categories, or products. Here’s how you lock it.
Click the Resources tab (1).
Click Select (2).
Select System Resource (3).
Then next, add the objects that the job changes or updates as resources (for example, order).
Click Select (4).

You want to add job steps.
In a new job, go to the Job Steps tab. An empty flow is already set up. This first flow is represented on the Job Steps page in the following image.
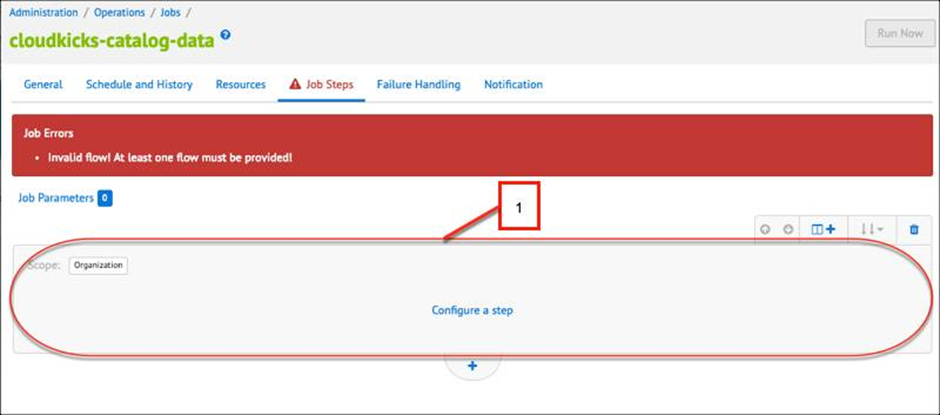
Click to Configure a step to create a new step in the flow.
In the Select and Configure step pane, select the system or custom job step you want to add to the flow. You can select ImportCatalog.
Specify the job step parameters. In a job, each job step has its own unique parameters. Hover over this unique parameter name to get more information about the parameter. These are the parameters for the ImportCatalog job step in our example.
Enter a unique step ID.
Add a description. This is visible in the workflow and job.
Specify the working folder. This folder contains the catalog files you want to import relative to IMPEX/src. If you don’t define this value, then SFCC uses IMPEX/src as the working folder.
Enter the FileNamePattern. This FileNamePattern is the name of the file you want to import and then use a regular expression (regex) to specify multiple files. If you don’t define this value, SFCC imports all files in the working folder.
You want to specify NoFilesFoundHandling, for what happens if SFCC doesn’t find any files to import.
You want to specify ImportFailedHandling, for what happens if the import fails.
You want to specify AfterImportFileHandling, for what happens to the file(s) after import.
You want to specify the ArchiveFolder. If it’s set to Archive or Archive zipped, this setting defines where SFCC stores file relative to the IMPEX directory. If it’s not defined, SFCC archives the files in IMPEX/archive.
Select the import mode:
Delete: In this mode delete the object.
Merge: In this mode create the object if it doesn’t exist, then do an update.
Replace: In this mode Re-create the object with the data provided.
Update: In this mode Update an existing object.
Select Always execute on restart if you want SFCC to restart the job if it fails. This step should always be included in the execution, even if SFCC completes the job before the restart.
You want to specify Error Handling, for how the system should respond to job errors.
For Scope, leave the value at its default of Organization and the ImportCatalog job step must be run with a scope of Organization.
Add a New Flow
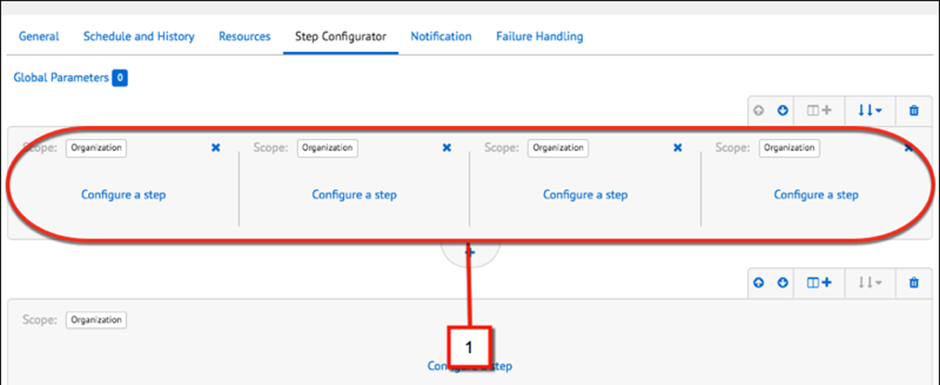
When you want to create a job, one flow is already configured for you. You can add all your job steps to that flow. You can create up to four sibling flows. Which an SFCC Business Manager represents side by side on the Job Steps tab. You can also configure sibling flows to run sequentially or in parallel.
However, if there aren’t enough resources for parallel execution or if a step type doesn’t support parallel execution, SFCC executes the sibling flows sequentially.
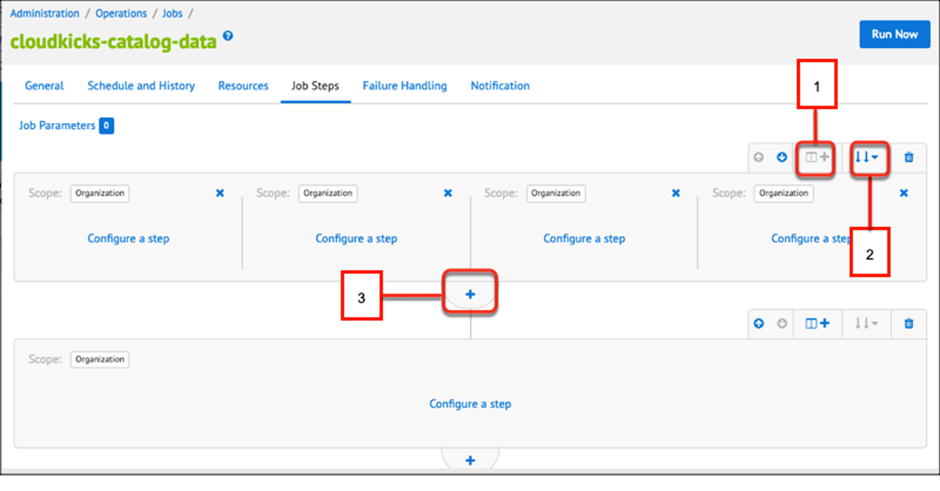
The following image shows the flow options on the Jobs tab.
Add a sibling flow.
You can toggle between sequential and parallel processing of sibling flows.
Add a new sequential flow.
Configure Troubleshooting Settings
To configure troubleshooting settings to help isolate problems. You can take these steps.
Go to the Failure Handling tab and select a failure rule. SFCC invokes the rule if a job step uses Error Handling on ERROR and specifies Error Handling Action as STOP.
Go to the Notification tab if you want to be notified about the status of a job.
Select Enabled.
If you want notification, then select which events you want to receive notifications about.
Enter the required email information.
You want to select Enabled under Long Runtime Detection and enter the runtime threshold.
Sometimes you receive a request for an important/emergency job or need to run a job manually when troubleshooting. Here’s what she does.
Open Business Manager.
Go to Administration > Operations > Jobs.
Select the job you want to run.
Click Run Now.
Examine the history section at the bottom of the page. You want to see if there are errors or problems with the job.
To check the status of jobs then, select Administration > Operations > Job History to monitor the status of jobs.
WRAP UP!!!
In this blog, we learned when to use jobs and the advantages of the new job framework. We also learned some important job concepts including flows, locks, scope, and schedule. Plus, we learned about what makes a job successful.